
Connecting Two Pairs of AirPods to a Mac or Windows PC
AirPods are widely recognized as the most seamless wireless earbuds for Apple users, yet their multi-device compatibility extends far beyond the typical single-user experience. A highly practical, often overlooked feature is the ability to connect two separate pairs of AirPods to one computer, whether you use a Mac or a Windows PC. This capability is ideal for sharing movies, music, or presentations with a friend or partner, eliminating the need to share a single headset. This expert guide details the precise, multi-step process required to establish dual-AirPods connectivity and synchronize the audio output across both operating systems.
Part 1: Establishing Dual AirPods Connection on macOS
Successfully using two pairs of AirPods simultaneously on a Mac requires two main stages: individually pairing both sets via Bluetooth, and then utilizing the built-in Audio MIDI Setup to create a single output source that combines both devices. For clarity and avoiding connection confusion, ensure both AirPods sets have different names before starting the pairing process.
Step 1: Pair Both AirPods Sets via Bluetooth
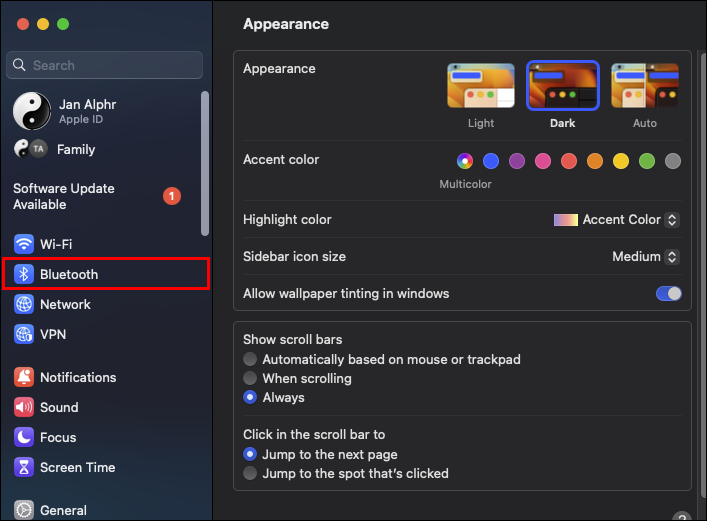
- Navigate to the Apple menu () in the far top-left corner of the screen.
- Select System Settings (or System Preferences on older macOS versions).
- Select Bluetooth and ensure the feature is turned on. Keep this window open throughout the pairing.
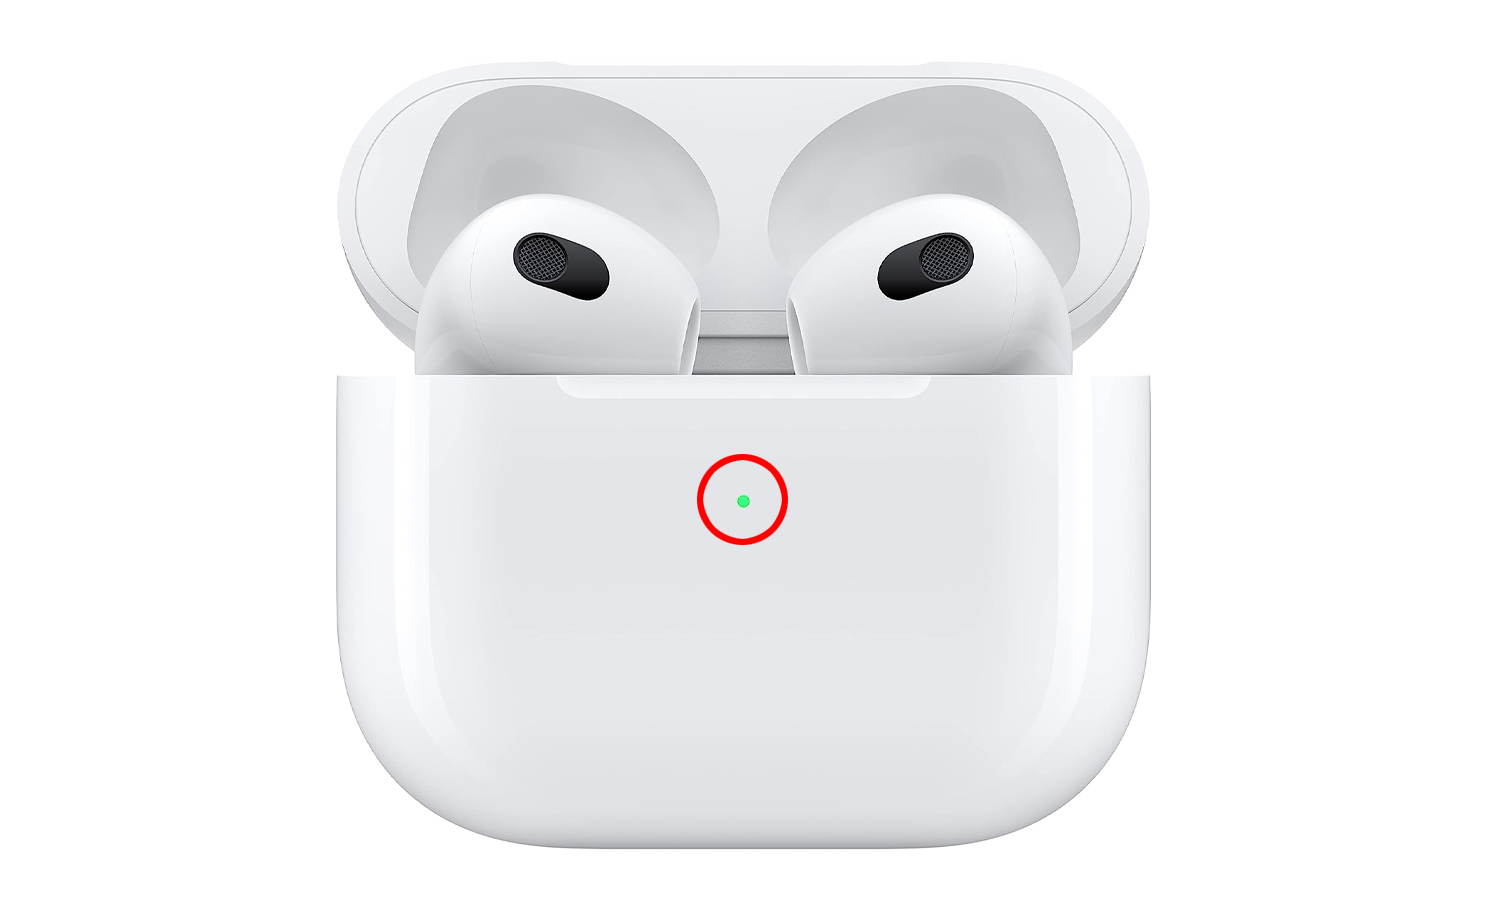
- For the first pair of AirPods: Open the case lid but keep the earbuds inside. Press and hold the setup button on the back of the case until the status light begins blinking white.
- In the Mac's Bluetooth preferences, locate the name of the first AirPods set and click Connect.
- Repeat Steps 4 and 5 for the second pair of AirPods.

Step 2: Synchronize Audio Output with Audio MIDI Setup
Since macOS does not natively support sharing audio to multiple Bluetooth devices (unlike iOS/iPadOS), you must create a Multi-Output Device using a system utility.
- Open a Finder window and navigate to the Applications folder, then open the Utilities folder. You can also use the shortcut Shift + Command + U.
- Launch the Audio MIDI Setup application.

- In the lower-left corner of the window, click the + icon.
- Select Create Multi-Output Device from the menu.

- On the right panel, check the box next to both paired AirPods.
- Select the new device in the left list (Multi-Output Device) and rename it (e.g., "AirPods Shared Audio").


- Control-click the newly renamed audio setup. Select Use This Device for Sound Output.
The Mac will now send a synchronized audio stream to both AirPods. Note: Volume sliders are linked; use the physical controls on the AirPods themselves to manage individual volume levels.
Alternative MacBook Pairing
If both AirPods sets are charged and held close to the MacBook with their lids open, an automatic connection prompt may appear on the screen. Click the AirPod icon, select the prompt "Use Both AirPods," and click Connect. This bypasses the manual Bluetooth pairing setup.
Part 2: Connecting Dual AirPods to a Windows PC
Connecting two pairs of AirPods to a Windows PC relies on successfully pairing both via the standard Windows Bluetooth menu.
- For the first pair of AirPods: Place them in their charging case with the lid open. Press and hold the back setup button until the status light begins blinking white.
- On your Windows PC, open Settings.

- Select Devices, then Bluetooth & devices. Ensure Bluetooth is active.

- Click + Add Device and select Bluetooth.

- Select your AirPods from the menu and click Connect.

- Repeat Steps 1 through 5 for the second set of AirPods.
- Click Done.
If audio sharing is problematic, media players like iTunes may allow you to select multiple audio outputs via the Airplay icon. Deselecting and re-selecting the Use for audio output option within iTunes can sometimes resolve single-output issues.
Troubleshooting Common Connection Issues
If your AirPods fail to connect or maintain a stable connection:
- Software Updates: Ensure your operating system (macOS or Windows) is running the latest available software version.
- Bluetooth Status: Confirm that Bluetooth is enabled and functioning correctly in your system settings.
- Pairing Mode: Always verify that the AirPods are in their case with the lid open, and the setup button is pressed until the status light is flashing white (pairing mode).
- Proximity: The AirPods should be kept close to the Mac during the connection process.
- Hard Reset: If all else fails, perform a hard reset on the AirPods (by holding the setup button for approximately 15 seconds) and repeat the entire connection process.
Successfully establishing a dual-AirPods connection is an effective way to elevate and share your listening experience with a friend or loved one, boosting the enjoyment of shared content.
Frequently Asked Questions (FAQ)
Why won't my AirPods stay connected after I pair them with my Mac or PC?
AirPods may automatically connect to a closer, previously paired device (like an iPhone). Ensure they are disconnected from all other devices. If the issue persists, try resetting your AirPods completely (by holding the setup button for ~15 seconds) and delete and re-pair them from your computer's Bluetooth settings.
Can I charge two different AirPods models (e.g., AirPods 2 and AirPods Pro) in the same charging case?
No. While you can often mix and match individual earbuds of the same model (if they are compatible), different AirPods models have unique case shapes and charging specifications. You must use the corresponding charging case for each distinct pair of AirPods.
Can I connect one individual AirPod to a Mac and the other individual AirPod from the same pair to a Windows PC simultaneously?
No. AirPods are designed to function as a unified stereo pair and will only establish a connection with a single host device (Mac or Windows PC) at any given time. Even if you only wear one earbud, it is still logically connected to only one computer.
Posting Komentar untuk "Connecting Two Pairs of AirPods to a Mac or Windows PC"